
You have probably all seen me rave about Make Up For Ever Face and Body foundation here but I had to bring it up again so I could add how great this product is for bronzing and temporary tanning.
I always start by prepping the skin well making sure I have a really clean well moisturised base to work from before I start applying makeup.
Following the base application I like to sweep the tiniest drop of Face & Body in a gorgeous nutty, tan shade (no.12 is usually perfect) across the apples of the cheeks, bridge of the nose and across the forehead using a dual fibre brush. I really work the product in blending with a light circular motion and build the colour where needed to get a flawless bronzed glow. Remember to pay attention to ears and necks too!
I find the the sheer, slightly dewy finish of the Face & Body gives a more natural tanned look as apposed to many traditional powder based bronzers. When used with a light touch you can let freakles show through too, adding to the natural finish we want.
I also follow the same procedure for the body, buffing a darker shade of Face & Body than I used for the base into the skin. I concentrate the colour where the sun usually hits most such as the shoulders, chest, outer arms, ect and blend, blend, blend, the colour outward.
As the Make Up For Ever Face and Body is transfer and water resistant you don't have to worry about the colour disappearing or ruining clothing which is a huge bonus!
Let me know what tips you have for getting a summer glow by leaving a message in the comments section below.
Tuesday 14 July 2009
Tuesday 30 June 2009
Sick Note :(
Sorry no post today! Ive hurt my wrist and havent been able to put together this weeks post for you all. Even typing this was a challenge but i will be back soon I promise....
Tuesday 23 June 2009
9 Ideas To Help Your Money Go Further
Saving the pennies is something on every ones mind right now but even more so if you're a freelancer. I wanted to share some ideas to help us all make our money go a little further each month but would also love to here your tips too so remember to leave a comment!
1. Quit the gym! Summer is the perfect time to cancel your gym membership as you can make the most of the nice weather and start walking, running or cycling in the great outdoors. If it's the classes you love club together with some girl friends and buy some workout dvd's that you can all do together a couple of times a week. You'll get fit and have a laugh too! I love the Ministry of Sound workout series.
2. Sign up for as many pro discount schemes as you can. Click here to find out more.
3. Do your research so you can make educated decisions and get the most out of your budget when buying something new for your kit. Often impulse buys turn out to be a waste of money. Trawl makeup blogs, forums and sights like inmykit.com for recommendations.
4. Look out for discounts, multi-buys and budget disposable products and bulk buy. You can never have too many tissues, cotton pads, q-tips, wipes ect so stock up and save money in the long run if you come across a great offer.
5. Got something to celebrate? Lots of restaurants are offering great deals at the moment, particularly if you eat out mid week, so sign up to receive emails from your favourite restaurants and Google to see if there are any money off vouchers you can print off before you book a table for a special night out.
6. I recently discovered the designer outlet village, Bicester which is an hour away from me in Oxford. I now visit every few months to stock up on discounted products from Molton Brown, The White Company, The Cosmetics Store and Cath Kidston which I keep on hand for birthdays and any occasion that requires a gift. I rarely need to spend more than £10 on a gift (not that anyone would know) with a little though and some sensible shopping. Use Google to find your nearest designer outlet.
7. My latest money saving find has been Read It Swap It which you must sign up to if your are a book worm like me. The site puts you in touch with like minded people to swap your old books with and the best bit is all you pay is the postage. I just got The Private Lives Of Pippa Lee and only spent 90p at the post office!
8. I am a magazine junkie but have cut way back since discovering sites such as Design Scene, {a glamorous little side project}, deMode and Fashion-ation. I save images I want to keep for reference to my desktop and now I have a really great body of work to refer to when I need some inspiration.
9. Get yourself a Cafetiere, some really good coffee (no instant pls!), and some lovely big coffee cups and stop spending your hard earned cash in over priced coffee house chains. You can then have a gossip with your friends over coffee and a cake in the comfort of your own home.
Tuesday 16 June 2009
Free Fonts to Personalise Your Marketing Tools
I recently came across a fantastic site, dafont.com, that lets you download hundreds of fonts and dingbats for free! I thought this could be a useful tool for those of you designing your website or business cards as the font you pick is such an important decision when branding your marketing materials.
The simplest way to tie your website, business cards and other marketing materials together is by using the same font through out so why not download an interesting font that stands out from the crowd and makes your cards a little more memorable.
So here is what you need to do…
1. Find a font to download by searching through the themed categories on dafont.com.
2. Click the ‘DOWNLOAD PC / MAC OS X’ button to the right.
3. Save the file to your desktop.
4. The files will be in a compressed folder so you need click 'Extract All Files'
5. It will give you an option to choose where the files are extracted to so send them too
C:\Windows\Fonts (if this doesn’t work try C:\WINNT\Fonts)
6. Now if you open a programme such as Word or Photoshop the font should be available for you to use.
Although there are lots of cool fonts for download be careful that the font you choose is still easy to read. It is so important that any information relating to your business, particularly contact information, is communicated in a clear, concise, easy to read format!
Another fun website for those who are interested in creating their own font is kevinandamanda.com so check them out too.
Be sure to check the 'Read Me' file that is downloaded with each font from dafont.com to check there are no restrictions on the use of the font you want to use!
Tuesday 9 June 2009
10 Tips For Those Looking For Agency Representation
Many artists see getting an agent as one of their top career goals so what can you do to prepare yourself and your book to achieve that goal?
Kathy Aragon who has been through the process has kindly shared some insider tips for those who are working towards agency representation.
1. The work you have in your book needs to show that you add value to the agency so it is important to have, not only excellent test shoot images, but work from paid jobs and tear sheets too.
2. Your book should show the agency you have experience working on multiple sets with a full crew so they have confidence sending you on a variety of assignments.
3. Your portfolio should be immaculate and beautifully presented. Don’t take the words ‘tear sheet’ literally. They will ideally want to see a book full of neatly cut out full page tears.
4. Of course every agent is different but most will want to see you are confident producing clean beauty looks. Clean looks also show the agent that you know how to edit your work which is important.
5. When building your book ‘Say no to random stuff on the face.’ This opinion was shared by many of the agencies Kathy heard speaking at the Makeup Show in LA. No feathers, no rhinestones, no gold leaf when you’re testing.
6. Agencies can spot a bad or overdone Photoshop job a mile off and generally don’t want to see overly Photoshopped images from tests in your book .
7. Before approaching an agency it is really important to do your home work. They will want to know that you have studied their artists and their work and that it matches what you want to do with your career.
8. Assisting the artists at a top agency is a great way to start building your relationship with the agency. If you call to put yourself forward for assisting opportunities mention specific artists you would like to assist. This gives them an idea of the direction you want to take your work and your inspiration. Be sure to also make it known that you are available to assist all of their artists so they know you are willing to assist anyone they represent to prove yourself. They want to see dedication.
9. Once you feel your book is ready you need to start by calling the agencies you’re interested in to find out what their submission process is and whether they are adding artists to their roster.
10. Not sure if your book is good enough to take to an agency? As a guideline when you are ready your work should be in line with the other artists represented by the agencies you are approaching.
You can view Kats work at www.kathyaragon.com or follow her on Twitter @KatAragon
If you too have agency representation like Kathy or have recently shown your book to an agency please share your experiences and tips in the comments section as I would love to hear from you.
Wednesday 3 June 2009
Dermalogica Ultracalming Cleanser 30% Discount
I'm a sure you have all see my rave reviews for Dermalogica's Ultraclaming cleanser but if you missed it the 1st time around click here....

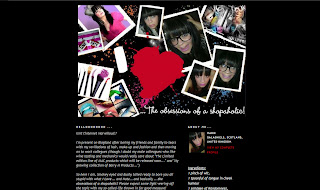
The reason why I thought to revive this old post is that the lovely Marie from the I Love...The Obsessions of a Shopaholic! blog has a code for 30% off my favourite cleanser courtesy of the Jersey Beauty Company posted today.
Skip on over to I Love...The Obsessions of a Shopaholic! to get the discount code now!
Don't forget that if you are a pro mua you can apply to join the Dermalogica Insider Programme which also entitles you to pro discount.
Tuesday 2 June 2009
Get Usable Image Files From A Test With These 6 Questions
A test shoot is a collaboration in which all parties involved should benefit from the pictures received. I don’t go in for contracts or think you should come across like a demanding diva when approached about a test shoot but you do need to discuss a few things with the photographer before the shoot so you can be sure what you receive later will be useful to you.
Here are some questions you should have answers to before any pictures are taken to insure that the image files you receive after the shoot are suitable for printing.
1. Can you get some close up shots of the makeup?
Always ask the photographer to get some close up shots of the makeup as part of the deal and remind them on the day that you need some head shots. A great beauty shot next to a full length image can look fantastic in your book and will show your skills as a makeup artist more clearly.
2. Can you start the day off with a really clean beauty look?
You should be focusing on clean beauty when you start building a portfolio so if you get roped into a test that doesn't involve clean beauty see if you can do a quick beauty look at the start of the day which you can build on after to achieve something more adventurous. This way everyone should get something usable for their books right from the start and you get more looks out of a days shooting.
3. Will you get Hi-Res files?
Make sure the photographer is going to provide hi-res files so you can print nice sharp images for your book. Low-res files are only suitable for posting online so they don’t take too long to load.
4. Does the photographer have watermarks on all his/her images?
If the photographer you are working with uses watermarks on his/her images check that getting files without the watermarks won’t be a problem so you can print the images for your book.
5. How many images should you expect to receive?
Discuss how many images you should realistically expect to receive and whether these files will have been retouched. Unless you are shooting a big editorial story it is unlikely that you would really need more that 5 images from a shoot.
6. Will you have any input into the final picture selection?
Often all parties involved are looking for something different for their books so it's great if you all have some input into the final image selection. If you are given a choice of images think about the composition in your book so the images you pick go together on a double page.
If you are unsure about any of the following points discuss them with the photographer in an email. Emails are great as it gives everyone a record of whats been agreed on to refer back to.
Do you have anything to add? Leave a comment below...
Thursday 21 May 2009
The 3/50 Project
I have come across the 3/50 project on a few blogs recently and thought it was such a fab concept that I must spread the word and share it with my readers too.
Although the 3/50 project, which suggests you take $50 a month a spend it in three local, independent stores, is obviously geared towards helping businesses in America there is no reason why we cant all think a little more about where we spend our pennies and support independent retailers when we can. Read on to find out how the project works....
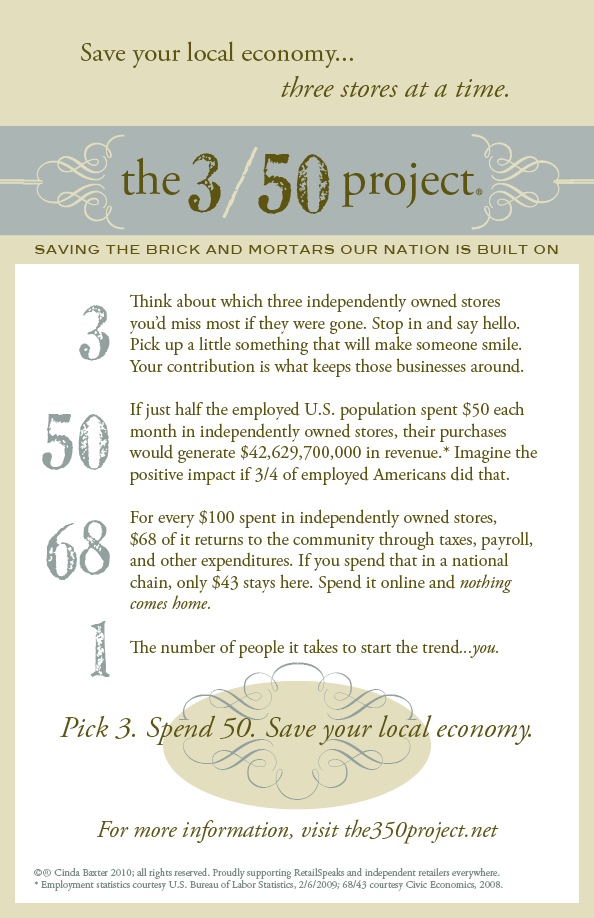
If any fellow bloggers would like to show their support for The 3/50 Project why not add their badge to your side bar? Click here to get your badge now.
Although the 3/50 project, which suggests you take $50 a month a spend it in three local, independent stores, is obviously geared towards helping businesses in America there is no reason why we cant all think a little more about where we spend our pennies and support independent retailers when we can. Read on to find out how the project works....
If any fellow bloggers would like to show their support for The 3/50 Project why not add their badge to your side bar? Click here to get your badge now.
Tuesday 19 May 2009
Tried and Tested: Make Up For Ever Face & Body Foundation
 I am a big fan of the Make Up For Ever line of cosmetics and not just because of their generous backstage card discount! Their Face and Body foundation is definitely a 'go to' product for me as I use it on just about every shoot I work on.
Make Up For Ever are one of the few lines to carry such a wide range of colours. With a selection of about 4 - 6 shades in your kit from the lightest to the darkest you shouldn't have a problem mixing a base to match anyone that sits in your chair.
The MUFE F&B base probably wont be favoured by those artists that like to work with products that give medium to heavy coverage even though it is buildable but it suits my way of working and is a kit staple and pro favourite for many.
Rather than covering up the skin I prefer to work with a lighter weight foundation that enhances the natural beauty of the model by just evening out the skin tone which Face and Body is perfect for. Even if I am working with someone with a blemish or two I prefer to use the MUFE F&B and just conceal with a cover up where needed.
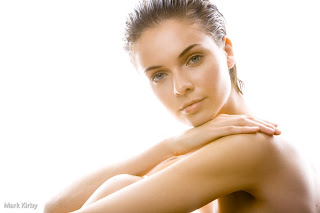 The MUFE F&B has an unusual texture straight from the bottle as it is comes in a gel, emulsion formula which needs to be really shaken up to get the silky texture you need for a flawless application. After shaking well I find I get a nice finish by applying the F&B with a regular flat foundation brush roughly all over the face and I follow that by buffing it into the skin with circular motions using a dual fibre brush. You get a subtle dewy finish with this product which I like to combine with a dual finish powder to matt the t-zone and give slightly more coverage in that area.
As the product is transfer resistant and waterproof it is perfect for use on the body in all kinds of situations. I find it works wonders for evening out tan lines! You just need to wait for it to dry and remove any excess product with a tissue before dressing the model.
Although the face and body foundation does only give a light buildable coverage it photographs beautifully which is why I rarely feel the need to reach for another base. The moisturising properties make this foundation very forgiving on those with dry skin and I find it to be a real hit with brides. The natural looking dewy finish is silky to the touch and leaves skin feeling like it can breath which is prefect for bridal, particularly if you work with those who wear little or no makeup day to day.
You can see 4 examples where I have used Make Up For Ever Face and Body by looking at the first page of my website. Click here...
As you can tell I can do little but rave about this product although I would love to hear your thoughts good and bad so please leave a comment if you have something to share.
picture source: makeupforever.com/alexcollinsonline.com
Monday 18 May 2009
A Classic Hollywood Make Over in 8 Steps
Sorry I have been MIA on the blog the past couple of weeks but I'm back and I wanted to kick start the week by sharing with you a guest post I wrote for the lovely blogger Laëtitia Wajnapel over on Mademoiselle Robot.

Over on Mademoiselle Robot I have posted 8 simple steps to help you achieve this classic Hollywood look with some tips thrown in for good measure.

The glamorous makeup looks of classic Hollywood stars have recently made a come back and are a real hit on the red carpet. When I was asked to write a guest post for Mademoiselle Robot I thought it was the perfect opportunity to share some of my tips for recreating the versatile vintage makeup look favoured by stars such as January Jones, Maggie Gyllenhaal and Kate Winslet. Click here to continue reading and find out how you can get the classic Hollywood look....
Subscribe to Mademoiselle Robot or Follow on Twitter and let Mademoiselle Robot help you find your own vintage style and fulfill all your most superficial needs!
Subscribe to:
Posts (Atom)


